Printing in Tally ERP 9
PART-A
In this post I am going to introduce various aspects of printing
option of Tally ERP 9.
The whole article is divided among three different post as
my previous article on Configuration. I am describing only General and Purchase
Transactions here. You may access other parts by following links given
below-
Part-B Printing in Tally ERP 9 (Payment Vouchers & Sales
Transaction)
Part- C Printing in Tally ERP 9 (Receipt, JV, Dr/Cr Note,
Reminder, Confirmations etc.)
The
printing option allows you to configure the printing parameters of a Voucher,
Invoice and Statement layouts before final printing.
Go
to Gateway of Tally > F12: Configure > Printing


General
Printing Configurations
The General Printing Configuration will help you to
setup the print screens for various reports and transactions.
This Configuration is applicable to all the reports
that are printed from Tally.ERP 9.

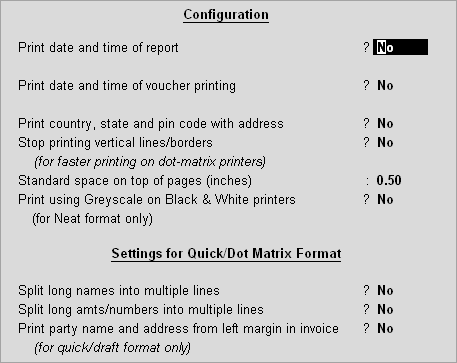
In Printing General
Configuration, by default the following configurations are available.
Print Date
& Time of Report
Setting this option to YES,
Tally.ERP 9 prints system date and time on Report printout. After enabling this
option, (on all pages of report) sub-option gets displayed. This sub-option is
used to decide whether to print system date and time in all pages or in first
page only.
Print Date
& Time of Voucher Printing
Setting this option to YES,
Tally.ERP 9 prints system date and time on Voucher printing. After enabling
this option, (on all pages of voucher) sub-option gets displayed. This
sub-option is used to decide whether to print system date and time in all pages
or in first page only.
Print State and
PIN Code with Address
Setting this option to YES,
Tally.ERP 9 prints state and pin code with address of company in Reports and
vouchers printing.
Note: This option also effect in invoice
Entry. During Invoice Entry, Party’s state and pin code is captured in
supplementary details below the address line.
Stop printing
Vertical Lines/Borders
Setting this option to YES,
Tally.ERP 9 will Not print the vertical lines for reports and voucher printing.
This enables faster printing in dot matrix printers.
Standard Space
on Top of pages (Inches)
This option is used to
set Top margin for reports and voucher printing.
By default, this field is set to 0.5 inch. However, you
can change it as per your requirement.
Settings for 'Quick Format'
Tally.ERP 9 prints in two formats – Neat and Quick. Neat
printing takes advantage of fonts of the printer and is the default. It also
compresses long data like long names and amounts and auto-fits them according
to space.
Quick printing is suitable for Dot Matrix printers where speed
is an issue. Hence, quick printing does Not print fancy fonts. The auto-fit
facility is, thus, Not possible in quick printing.
Therefore, it will truncate data longer than the allotted space.
To prevent this, Tally.ERP 9 provides two options:
Split Long
Names into Multiple Lines
This option enables to
split long names into multiple lines during printing.
Split Long
amts/numbers into Multiple Lines
This option enables to
split long amounts or numbers into multiple lines during printing.
Print Party
Name and Address from left margin in invoice
This option enables you
to print the Party Name and Address from left margin in invoice during printing
Purchase
Transactions
The Purchase printing
option allows you to configure the printing of Purchase Invoice, Purchase
Orders and Receipt Note.
Go to Gateway of Tally
> F12: Configure > Printing > Purchase Transactions

Purchase Voucher / Invoice
This screen allows you to configure a
purchase invoice for printing. The Print Configuration settings shown
below is applicable to purchase voucher type only.
Title of
Document
By default, Title of
Purchase Invoice will be displayed as INVOICE. However, you can change
the Title as per your requirement.
Note:
You can also set the title for Optional Purchase Invoice.
Sub Title (if
any)
By default, sub-title
of purchase invoice is set as blank. However, you can set the sub title as per
your requirement.
Voucher/
Invoice Print Page Setup
Page setup contains
Height, width, Top margin and left margin. By default, Height is set as 10
inch, width is set as 7.50 inch, Top margin is set as 0.25 inch and Left margin
is set as 0.50 inch.
Number of copies
to print
By default, number of
copies is set as 1. However, you can increase the number of copies as per your
requirement.
Print in Simple Format
By default, Tally.ERP 9
prints the purchase invoice in Invoice format. By setting this option - Print
in Simple Format to Yes, to
print the invoice in simple format.
Print in Voucher Format
Set this option to Yes
to display the purchase invoice in Invoice format. This option can be enabled
or disabled only if the option Print in Simple Format is set No.
Print Cost Allocation in Voucher
format
By default, this option
is set to No. Set this option to Yes to print cost allocation
details in the purchase invoice.
Print Voucher reference
Set this option to Yes to print the purchase voucher
reference number in the purchase invoice. By default, this option is set to Yes.
Print Order Details
Set this option to Yes
to print the purchase order number and date in the purchase invoice. By
default, this option is set to No.
Print Company's PAN /
Income Tax No.?
Set this option to Yes to print the company's PAN as
mentioned in the Statutory & Taxation features screen.
Print Company’s Tax Regn. Numbers
Set this option to Yes to print the company’s tax
registration number as mentioned in the Statutory & Taxation features
screen. By default, this option is set to Yes.
Print Buyer's Tax Regn. Numbers
Set this option to Yes to print the buyer's tax
registration number as mentioned in the ledger master. By default, this option
is set to Yes.
Print Buyer's CST Regn. Numbers
Set this option to Yes
to print the buyer's CST registration number as mentioned in the ledger master.
By default, this option is set to Yes..
Print Complete Mailing details
By default, this option
is set to Yes. Tally.ERP 9 prints
the complete mailing details of the Supplier, namely, Contact Person, Telephone
number, Fax and E-Mail which are provided in the supplier's ledger master.
Note: This option appears if
either Accept Supplementary Details or Allow Separate Buyer and Consignee
Names options is set to Yes in
Purchase Invoice
Configuration.
Print Serial NO.
By
default, Tally.ERP 9 prints the serial number for each item in the purchase
invoice.
Print Part No.
By default, this option
is set to No. Set this option to Yes to print the Part Numbers of the
Stock Item.
Print Quantity Column
By default, this option
is set to Yes. Tally.ERP 9
prints the billed quantity of the stock item in the purchase invoice.
Print Alternate Quantity
Set this option to Yes
to print the Alternate quantity in the purchase invoice. By default, this
option is set to Yes.
·
Print as separate Column: This is a
sub-option of Print Alternate Quantity. This option is by default, set to No.
Enabling this option prints the alternate quantity in a separate column.
Print Actual Quantity Column
By default, this option
is set to No. Enabling this option prints
the item shipped (actual) quantity in the purchase invoice when printed in the
simple format.
Print Rate Column
Set this option to
print the rate per unit of stock item in the purchase invoice. By default, this
option is set to Yes.
Print Batch Details
Set this option to Yes to print the stock item batch
details that include batch number, manufacturing date and expiry date. By
default, this option is set to Yes.
Print Godown Name
Set this option to Yes to print the name of the godown
selected in the purchase invoice.
Print Godown Address
Set this option to Yes to print the address of the godown
from which the stock item is shipped.
Print Rate of Duty with items
By default, this option
is set to No. Set this option to Yes to print the stock item Rate of
duty in the purchase invoice.
Print Sub-Totals for each line
Set this option to Yes to print lines for each sub-total.
By default, this option is set to No.
Print Narration
Set this option to Yes to print narration details in the
Remarks field of purchase invoice or when the option Print in Simple format
is enabled. By default, this option is set to No.
Print Narration for each entry
Set this option to Yes to print the narration for each
entry in the purchase invoice. By default, this option is set to No.
Print Base Currency Symbol for
Total
Set this option to Yes to print the base currency symbol
for Total in the purchase voucher/invoice. By default, this option is set to Yes.
Method to use for
Ledger Name
This list of options displays different printing methods
for displaying the Ledger Name in the purchase invoice or the purchase invoice
in simple format.
Method to use for Stock Item Name
This list of options
displays the different printing methods for displaying Stock Item Name in the
purchase invoice or the purchase invoice in simple format.
Jurisdiction
By default, the field
jurisdiction is blank. You can set the jurisdiction as per your requirement to
print in the purchase invoice. The Default Jurisdiction defined in the Voucher
Type Master, if any, will override the Jurisdiction provided here while
printing.
Jurisdiction is
printed:
·
At the bottom, in the Invoice format
·
At the Top, when the option Print in
simple format is enabled
Receipt Note
This screen allows you
to configure the Receipt Note for printing. The Print Configuration settings
shown below is applicable to receipt Note voucher type only.


Note:
The options of the above Receipt Note Printing Configuration screen are the
default settings.
Title of
Document
By default, Title of
Receipt Note will be displayed as Receipt Note. However, you can change the
Title as per your requirement.
Note: You can also set the Title for
Optional Receipt Note.
Sub Title (if
any)
By default, sub-title of purchase invoice is set as blank.
However, you can set the sub title as per your requirement.
Voucher/ Invoice Print Page Setup
Page setup contains Height, width, Top margin and left margin.
By default, Height is set as 10 inch, width is set as 7.50 inch, Top margin is
set as 0.25 inch and Left margin is set as 0.50 inch.
Purchase Order
This allows you to configure the Purchase Order for
printing. The Print Configuration settings is applicable to Purchase Order
voucher type.


Some of the printing
configurations are already explained under Purchase Printing Configuration.
Print Company Logo
This option will be set
to Yes, by default in case the
option Print Company Logo is enabled in F11:
Accounting Features.
Note:
The field Location of Logo is also displayed in Purchase Order Printing
Configuration screen that appears on pressing F12 key or clicking
F12: Configure button from the Voucher Printing screen of the Purchase Order
voucher. The logo path can be changed temporarily based on your
requirement.
Print Terms of Payment and
Delivery
By default, Tally.ERP 9
prints the Terms of Payment and Delivery entered in the Supplementary details
of a Purchase Order. If you set this option to No, in supplementary details, Terms of Payment and Delivery will Not
appear in Purchase order Printing.
Print details of Despatch
By default, Tally.ERP 9
prints the details of dispatch which includes Dispatch through (mode of
transport) and Destination as entered in the Supplementary Details of a
Purchase Order.
Print Delivery Date / Batch
Details
Set this option to Yes to print the due date of the order
and the batch details. By default, this option is set to No.
Download the whole post in a pdf file by clicking